.
venerdì, 13 febbraio 2009
Coniglia a 2 ruote: Lily
http://www.youtube.com/watch?v=5PzEqJHj_jY
Come costruire il carrellino
(testo orininale in inglese a fronte)
http://www.youtube.com/watch?v=5PzEqJHj_jY
Come costruire il carrellino
(testo orininale in inglese a fronte)
| Aggiornamento: Alla fine di dicembre Lily si è ammalata gravemente e non ce l’ha fatta. Abbiamo fatto tutto quello che si poteva per lei, ma alla fine non avrebbe potuto reggere di più. E’ stata una coniglia molto molto affettuosa (leccando qualunque cosa e chiunque fosse in sua presenza) e ci manca. Poiché ho ricevuto così tante domande su come ho fatto, pubblico qui sotto le risposte che ho dato a tutti: | update: At the end of Dececmber Lily got very sick and passed away. We did everything we could for her, but in the end she just couldn't hold on anymore. She was a very very affectionate bunny (licking everything and anyone in her presence) and we miss her. Since i;ve gotten sooo many questions about how i made this i will post the response i give to everyone: |
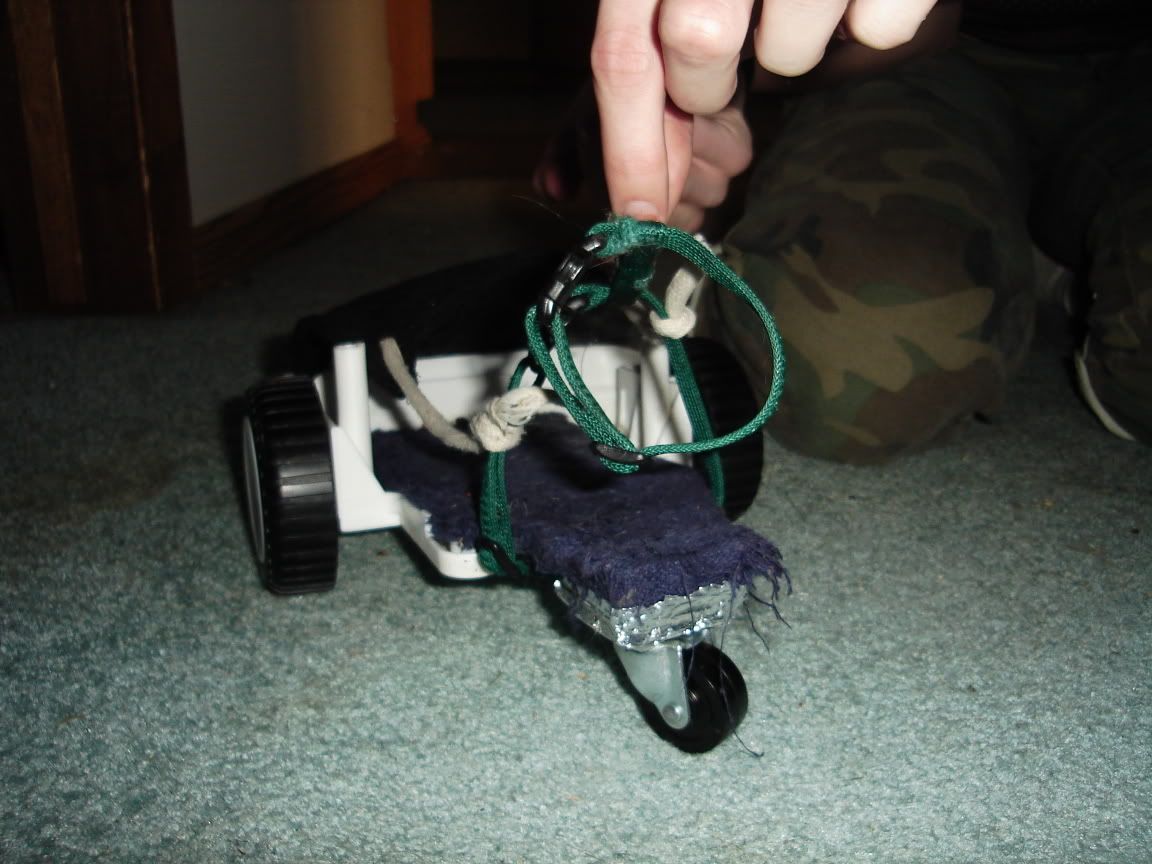
| bene, abbiamo girato a lungo tutto il giorno cercando di trovare una macchinina giocattolo che fosse abbastanza ampia e con le ruote giuste ... abbiamo finito per scegliere quest’auto della barbie a basso costo, e per fortuna la parte superiore si è svitata via facilmente in un modo da lasciare una base... è difficile da spiegare, ma la parte superiore con i sedili è venuta via, e quindi è rimasto solo il fondo, con le due ruote, come un rimorchio per le barche. Questo non è risultato abbastanza lungo così abbiamo aggiunto un sottile pezzo di legno, che vi abbiamo avvitato sopra. La nostra coniglia non poteva tenere la sua parte anteriore correttamente, per cui abbiamo aggiunto una ruota girevole verso la parte anteriore per farlo diventare a tre ruote. Abbiamo incollato del panno intorno alla base di legno in modo da renderlo più comodo. Poi abbiamo legato un altro pezzo di tessuto intorno alla parte posteriore della sedia, che veniva su sopra alla schiena di Lily e veniva legato a un’imbragatura, che chiudevamo sotto al fondo e attorno alla coniglia. Per rendere più facile da capire tutto questo, qui ci sono alcune immagini: | well, we drove around all day long trying to find a toy car that was wide enough and with the right wheels... we ended up with this cheap barbie car, and fortunately enough the top screwed off of it in a way that left a base... its hard to explain, but the top with the seats came off, and then it was just the bottom, like two a wheeled boat trailer. this wasn't long enough so we added a thin piece of wood, which we screwed in. our bunny couldn't hold her front up properly, so we added a caster wheel on the front to make it into a three wheeler. we glued some terry cloth around the wood base so it would be more comfy. then we tied another piece of fabric around the back of the chair, which came up over her back and tied onto a harness, which we clipped under the bottom and onto the rabbit. to make this easier to understand, here are some pictures: |
.
.
.
.
.
.

5441 visualizzazioni
Questa è solo un'idea, ma giocateci intorno ad essa... noi abbiamo cercato carrellini on-line, ma non c'era nulla che potevamo permetterci, e nulla che fosse così leggero ... sostanzialmente nulla che fosse adatta alla nostra situazione particolare. Speriamo che questo vi aiuti! Se avete altre domande, non esitare a chiedere: si può prendere un po’ di tempo da parte mia per rispondere! | this is just an idea, but play around with it... we looked for wheelchairs online, but there was nothing we could afford, and nothing that was this lightweight... basically nothing that fit our particular situation. hope this helps! if you have any further questions, feel free to ask, but it may take a while for me to respond! |
postato da: amicidigreta alle ore 14:04 | Link | commenti
categoria:animali disabili, storie di animali speciali, storie - conigli paralizzati, carrello faidate coniglio lily, carrelli modelli x conigli, consigli - coniglio carrello
categoria:animali disabili, storie di animali speciali, storie - conigli paralizzati, carrello faidate coniglio lily, carrelli modelli x conigli, consigli - coniglio carrello
Nessun commento:
Posta un commento